How to Make Your Bash Terminal Look Good with Go & Google Fonts
Making your Bash terminal visually appealing involves two main aspects: choosing the right font for your terminal emulator and customizing your Bash prompt (PS1) and colors. While Google Fonts are primarily for web, many excellent monospaced fonts (ideal for terminals) are available for download from Google Fonts. Go can be used to create highly customized and performant dynamic Bash prompts.
This guide will walk you through setting up a great font and give you an introduction to building a custom prompt with Go.
Estimated Time: 30-60 minutes (depending on Go familiarity)
You will find examples tailored for **Arch Linux, Ubuntu/Debian, and FreeBSD** systems throughout this guide.
Prerequisites
Before you begin, ensure you have the following:
- A Terminal Emulator: This is the program you use to access Bash (e.g., Alacritty, Kitty, Konsole, GNOME Terminal, xterm, st, etc.). Most modern emulators allow font customization.
- Go Installed: For the custom prompt section.
Installing Go
# On Arch Linux
sudo pacman -S go

# On Ubuntu/Debian
sudo apt update
sudo apt install golang-go

# On FreeBSD
sudo pkg install go
Step 1: Choosing & Installing a Terminal Font (Google Fonts Angle)
While Google Fonts themselves are designed for web use, many excellent monospaced fonts (where all characters have the same width, crucial for terminals) are hosted on Google Fonts and are available for download and system-wide installation. These often include "ligatures" which can make code look cleaner.
Recommended Fonts from Google Fonts (or similar popular choices):
- Fira Code: Popular for programming with ligatures. (Often available via package managers)
- Source Code Pro: Adobe's excellent open-source monospaced font.
- JetBrains Mono: (Not strictly Google Fonts, but very popular and high quality)
- Hack: Another great open-source option.
For this guide, let's assume you're interested in Fira Code.
1.1 Download the Font
- Visit the Fira Code GitHub releases page (or Google Fonts directly for others).
- Download the latest
FiraCode.ziporFira_Code.zipfile. - Extract the
.ttfor.otffiles from thettf/directory within the zip file. You'll usually want the "Retina" or "Regular" variants.
1.2 Install the Font System-Wide
On Arch Linux:
The easiest way is usually through yay or pacman if an otf-fira-code or ttf-fira-code package exists.
# Using yay (recommended):
yay -S otf-fira-code # Or ttf-fira-code, depending on the package name

# Manual Installation:
mkdir -p ~/.local/share/fonts
cp ~/Downloads/FiraCode-*.ttf ~/.local/share/fonts/ # Adjust path
fc-cache -fv
On Ubuntu/Debian:
Fira Code is typically available in the official repositories:
sudo apt update
sudo apt install fonts-firacode
For manual installation (if not available via `apt` or if you prefer):
mkdir -p ~/.local/share/fonts
cp ~/Downloads/FiraCode-*.ttf ~/.local/share/fonts/ # Adjust path
fc-cache -fv
On FreeBSD:
# Using pkg (recommended):
sudo pkg install fira-code

# Manual Installation:
mkdir -p ~/.fonts
cp ~/Downloads/FiraCode-*.ttf ~/.fonts/ # Adjust path
fc-cache -fv
1.3 Set the Font in Your Terminal Emulator
This step varies greatly depending on your terminal emulator. Here are common ways:
- Alacritty: Edit
~/.config/alacritty/alacritty.yml.Alacritty Font Configurationfont: normal: family: Fira Code bold: family: Fira Code italic: family: Fira Code bold_italic: family: Fira Code size: 11.0 # Adjust size as desired - Kitty: Edit
~/.config/kitty/kitty.conf.Kitty Font Configurationfont_family Fira Code font_size 11.0 - Konsole (KDE): Open Konsole -> Settings -> Configure Konsole -> Profile (e.g., "Shell") -> Appearance tab -> Select "Fira Code" and desired font size.
- GNOME Terminal: Open GNOME Terminal -> Preferences -> Profiles tab -> Select your profile -> Text tab -> Uncheck "Show monospace fonts only" if Fira Code doesn't appear immediately, then choose "Fira Code" and set the size.
- Xterm/URxvt: You'd typically set this in your
~/.Xresourcesor~/.Xdefaultsfile:Then load withXterm/URxvt Font ConfigurationXTerm*faceName: Fira Code XTerm*faceSize: 11xrdb -merge ~/.Xresources.
Restart your terminal emulator after setting the font. You should immediately see the new font applied.
Step 2: Customizing Your Bash Prompt with Go (Advanced)
Creating a dynamic Bash prompt using a compiled Go program offers excellent performance and allows for complex logic that might be cumbersome in pure Bash. We'll create a very simple Go program that outputs a colored prompt string.
2.1 Create Your Go Prompt Program
Create a new directory for your Go project (e.g., ~/go-prompt):
mkdir ~/go-prompt
cd ~/go-prompt
nano main.go
Paste the following Go code into main.go:
package main

import (
    "fmt"
    "os"
    "os/user"
    "strings"
)

// ANSI escape codes for colors
const (
    Reset  = "\033[0m"
    Bold   = "\033[1m"
    Cyan   = "\033[36m"
    Green  = "\033[32m"
    Yellow = "\033[33m"
    Blue   = "\033[34m"
    Red    = "\033[31m"
)

func main() {
    // Get current user and hostname
    u, err := user.Current()
    if err != nil {
        fmt.Print(Red + "error" + Reset)
        return
    }
    hostname, err := os.Hostname()
    if err != nil {
        fmt.Print(Red + "error" + Reset)
        return
    }

    // Get current working directory, shorten if in home dir
    cwd, err := os.Getwd()
    if err != nil {
        fmt.Print(Red + "error" + Reset)
        return
    }

    homeDir := u.HomeDir
    if strings.HasPrefix(cwd, homeDir) {
        cwd = strings.Replace(cwd, homeDir, "~", 1)
    }

    // Determine prompt symbol based on user (root vs. non-root)
    promptSymbol := "$"
    if u.Uid == "0" { // Root user
        promptSymbol = "#"
    }

    // Construct the prompt string
    // Example: [user@hostname /path/to/cwd] $
    prompt := fmt.Sprintf("[%s%s%s@%s%s %s%s%s]%s %s",
        Green, u.Username, Reset, // Username in Green
        Blue, hostname, Reset,    // Hostname in Blue
        Cyan, cwd, Reset,         // Current directory in Cyan
        Yellow, promptSymbol, Reset, // Prompt symbol in Yellow
    )

    fmt.Print(prompt + " ")
}
Save and exit nano (Ctrl+X, Y, Enter).
2.2 Compile Your Go Program
Compile the program. This will create a standalone executable.
cd ~/go-prompt
go build -o myprompt # Creates an executable named 'myprompt'
You can test it by running ./myprompt. It should output your new prompt string.
2.3 Integrate into Your Bash Configuration
Now, you need to tell Bash to use your myprompt program. Edit your Bash configuration file:
nano ~/.bashrcAdd the following lines at the end of your ~/.bashrc file:
# Custom Go Prompt
# Ensure the path to your Go prompt executable is correct
export PATH="$HOME/go-prompt:$PATH" # Add go-prompt dir to PATH
PROMPT_COMMAND='PS1=$(myprompt)'
Explanation:
export PATH="$HOME/go-prompt:$PATH": This line adds the directory containing yourmypromptexecutable to your system'sPATH. This allows Bash to find and runmypromptby just typingmypromptinstead of needing the full path~/go-prompt/myprompt.PROMPT_COMMAND='PS1=$(myprompt)': This is the key line.PROMPT_COMMANDis a special Bash variable. If it's set, Bash executes the command defined in it just before displaying each new prompt. In this case, it runs yourmypromptprogram, captures its output, and sets it as yourPS1(the primary prompt string).
Save and exit nano.
2.4 Apply Changes
For the changes to take effect in your current terminal session, you need to source your ~/.bashrc:
source ~/.bashrcYou should immediately see your new Go-powered prompt! If there are issues, double-check the path to myprompt and any error messages.
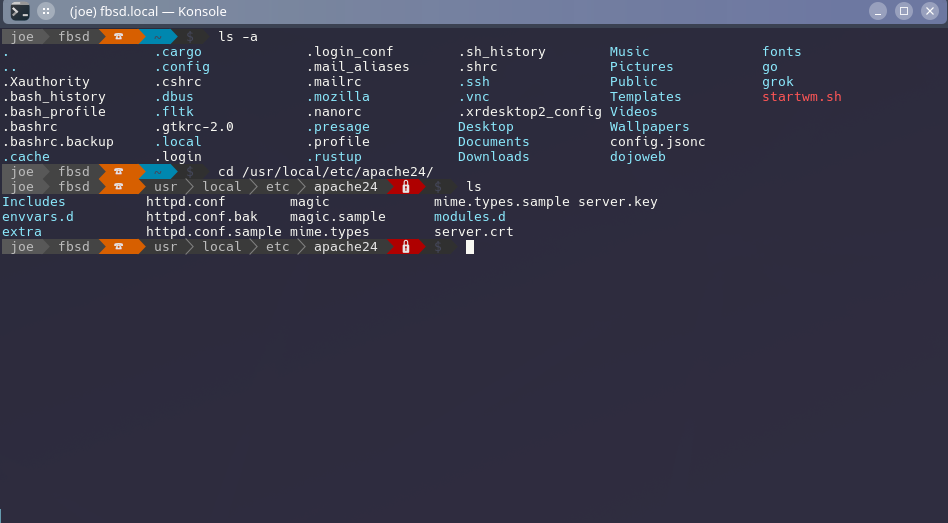
Here's an example of what your Go-powered Bash terminal might look like:
Step 3: Color Schemes and Terminal Themes
While your font and prompt are a big part, a good color scheme makes a huge difference.
- Terminal Emulator Themes: Many terminal emulators come with built-in color schemes (e.g., Solarized, Dracula, One Dark) or allow you to import
.Xresourcesor.colorschemefiles. Check your emulator's preferences. dircolors: This command sets up colors forlsoutput.- On **Arch** and **Ubuntu/Debian**, the default
lsusually has colors enabled. - On **FreeBSD**, you might need to enable it in
~/.bashrc:Enable dircolors on FreeBSD# For colored ls output on FreeBSD if [ -x /usr/local/bin/dircolors ]; then eval "$(dircolors -b)" fi
You can find many
dircolorsthemes online (e.g., fromdotfilesrepositories).- On **Arch** and **Ubuntu/Debian**, the default
Step 4: Other Enhancements
- Aliases: Shorten frequently used commands in
~/.bashrc.Example Aliasesalias ll='ls -alF' alias gs='git status' - Dotfile Management: Use a tool like GNU Stow or a simple Git repository to manage your
~/.bashrc,~/.config/alacritty/alacritty.yml, etc., across your various Linux and FreeBSD systems. - Alternative Prompt Frameworks: If the Go prompt seems too complex for your needs, consider simpler Bash frameworks like:
- Oh My Bash: A community-driven framework for managing Bash configurations.
- Starship: A cross-shell prompt written in Rust, extremely fast and highly customizable, with pre-built binaries available for easy installation. This is a popular alternative to writing your own Go prompt.
Conclusion
By following these steps, you've selected a visually appealing monospaced font from the Google Fonts ecosystem, installed it on your Linux (Arch, Ubuntu/Debian) and FreeBSD systems, and configured your terminal emulator to use it. You've also learned how to leverage Go to build a custom, performant Bash prompt, taking your terminal customization to the next level. Enjoy your good-looking Bash terminal!